

How To Fold a Bunny Napkin
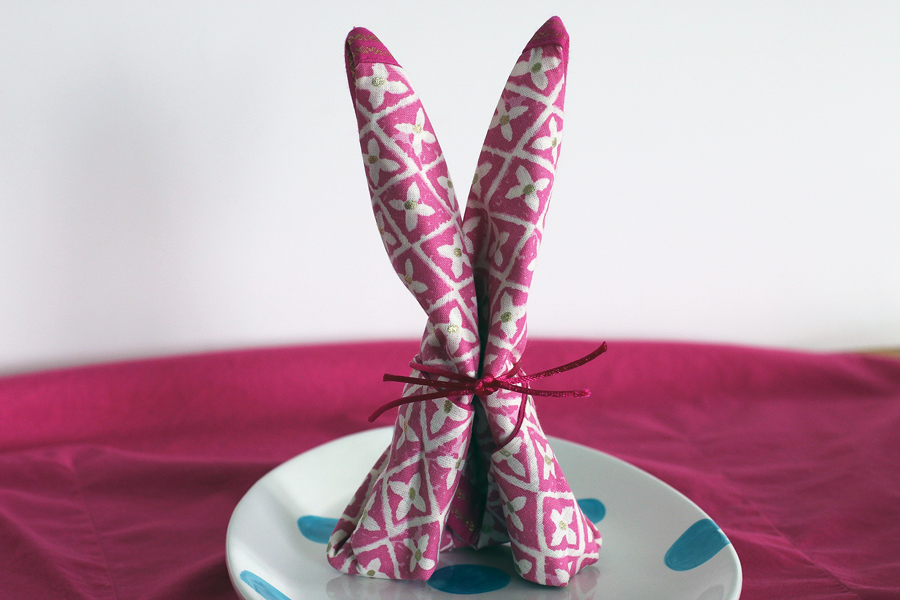
Here’s some Hare-Raising fun for YOU! Learn how to fold a Bunny Napkin for all your Spring parties. I added a little silk cord to give the bunny napkin some “whiskers” and added stability. I was so pleased with how much personality the little knotted nose and whiskers added.

I’m also crazy for his/her adorable little cottontail on the backside. They are super cute on a plate or allow them to go wild and hop all over the table. Just add some paper grass and tulips for a fun and decorative table.

How to Fold a Bunny Napkin
All you need are square napkins in the color of your choice, a ribbon or cord, (silk or raffia would be super cute), an iron, and your ironing board. Then just follow the folding instructions from Taste or Home below, and press with your iron each time you make a new fold.
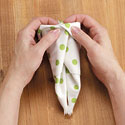
After step 6 I tied and secured my bunny with the cord. All I did was tie a simple knot and trim the ends. Then I took another smaller piece and tied it again, then trimmed the ends, easy peasy!
Fold the bottom third of the napkin up and the top third down, making a rectangle.
Step-by-Step:
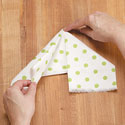
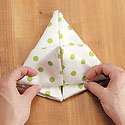
1. Find the center along the top fold and fold the top corners down, making sure the bottom ends are even.
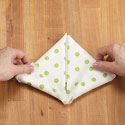
2. Fold up the outside bottom corners.
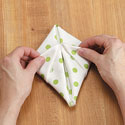
3. Fold left and right sides so that they meet in the center.
4. Turn the napkin over and flip the top to bottom. Fold bottom point up.
5. Fold the left and right corners to the back and tuck one corner into the other to hold.
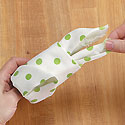
6. Hold the tucked corners securely and pull out the bunny ears on the other end.
I learned how to fold a bunny napkin and put mine together 2 weeks before Easter dinner. It was such a great feeling to have them all ready to go, and my Easter dinner table looked delightful for my family and friends. I used bright different colored napkins that matched bright Easter eggs.
Thanks for reading and visiting Cheery Kitchen. Now it’s your turn. Do you have a memory or idea from your Easter celebrations you’d like to share? Maybe it’s something special you enjoy eating, a family tradition, or an activity. Please let us know in the comments below.
If you fold Bunny Napkins and send us pics, we’ll happily share them here, and look to your right for a “How to Fold a Bunny Napkin” pin you can keep and share!
“HOPPY” Easter all!

 We're Alison and Renée, and we're so glad you've joined us! Our kitchens are our happy place, where we're whipping up memories. Get comfy and check things out. We hope you find inspiring dishes and ways to better your life. Feeling optimistic, trying new things and sharing with those we love brings joy in all we do. It's time to cook, create and celebrate. CHEERS!


I am definitely going to folding some bunny napkins. I love napkin folding. It’s like origami but even better!
This is so cute! I wish I was having Easter at my house to try this out. I wonder if my SIL would let me fold her napkins tomorrow?! The step by step instructions are so helpful too! Thanks for posting them!
Lovin’ the cute fringe on the ears! Happy Easter Gnee:@)
Love this tutorial!! I hope you’ll get the chance to stop by and share it at this week’s Tuesday To Do Party.
http://www.blackberryvine.blogspot.com
Smiles!
Jami
I love,love your blog! You have just shown how to post my blogon so many sites, without coming up with new stuff..and forgetting where I have already posted..etc. Love the bunny napkin, the fabric is great too. Have a nice day..I gotta rethink now! LOL! Sunny109
Not only do I love this fold, I love these napkins. Where did you find them?
Very nice! I’d love for you to link up at Inspire Me Mondays.
http://singingthreelittlebirds.blogspot.com/2011/04/inspire-me-monday_25.html
I taught 100 6th graders how to do this last week and they loved it – love your napkins! Stop over to enter the coffee burlap bag giveaway
So cute. I love learning different napkin folds. :-)I would love it if you would link this project up to my blog party, A Marvelous Mess….each week I pick one project to feature on my side bar!! Here is the link: http://tinyurl.com/3chfp5t
LOVE the tutorial. makes it simple. cool blog.
kathryn
http://www.thedragonsfairytail.blogspot.com
how adorable will have to remember this next easter
What a fun post to share! Thanks.
Lovely tutorial!
http://houseonashwelllane.blogspot.com/
Just wanted to share that this has been featured on our SMITTEN: SPRING 2012 GUIDE!
http://limefishstudio.blogspot.com/2012/03/smitten-spring-2012-guide.html
Now, isn’t this just so cute! I’ve seen napkins and towels folded into animal shapes, but never knew how to fold them myself. Now, at least I know how the bunny is done!