


No-Knead Crusty Artisan Bread and Rolls

Are you looking for New York’s “upper crust?”

One of the great joys of our service in New York City, for 18 months, was feeding lots of missionaries, students, and friends from our church. Most of these gatherings were fairly informal. I tried to plan something filling and nutritious on a limited budget for a large group. When we grilled chicken breasts or made pulled-pork I ordered delicious rolls at Parisi Brother’s Bakery on 31st and Broadway, in Astoria, Queens. Picking up our large order at 7 AM, still hot, these steamy rolls fogged up our car and made it smell fabulous!
Upon finishing our mission, we returned to a small town in the West. No more plentiful bakeries and missing my New York resource, I thought back to 2006 when Mark Bittman of the NY Times started a frenzy in the baking world. He published Jim Lahey’s, No-Knead Bread recipe. Lahey, worked as a baker at Manhattan’s Sullivan Street Bakery.
I found the recipe again for for No-Knead Crusty Artisan Bread and went to work, hoping for big city results. What a snap! It’s so crusty, easy, and everybody loves it. Jim’s inventive method allows time to do all the work while you sleep and then do everything else!
You will need a dutch oven or large pot with a lid. It needs to handle high heat and be plastic free. My favorite pot is a Lodge, 4-quart, cast iron dutch oven with handles, in other words it doesn’t have to be fancy. I use the old pan we use for Dutch-oven cooking and camping. Other than that, everything else you need is pretty basic.
No-Knead Crusty Artisan Bread and Rolls

Enjoy the most delicious crusty artisan bread and rolls without paying outrageous bakery prices.
Serves: 1 loaf or 6 large sandwich size rolls
Ingredients
- 3 cups all-purpose flour, (plus more for dusting)
- 1½ cups luke-warm water
- 1-1//2 teaspoons kosher salt
- 1 tsp yeast*
- non-stick spray for pot
- cornmeal for pot
Instructions
- In a large bowl, stir together the flour, salt and yeast.
- Add the water and using a Danish whisk or wooden spoon stir together until the mixture resembles a shaggy dough.
- Cover dough with a plastic lid or plastic wrap. Don't put the lid on tightly, just set it over the bowl and let sit at room temperature for 8-18 hours. Dough will bubble up and rise.
- After dough is ready, preheat oven to 450°.
- Turn the dough onto a well-floured surface and with floured hands form the dough into a ball. Cover with a light towel and let the dough rest.
- Spray pan with non-stick spray and sprinkle with cornmeal.
- While dough is resting, put your dutch oven into the preheated oven for 30 minutes.
- After the 30 minutes are up carefully remove the dutch oven and with floured hands place the bread dough into it.
- Replace the cover and bake for 30 minutes covered. Then remove the cover and bake for an additional 15 minutes uncovered. Bread will be golden, crusty and delicious!
Notes
*I used a full teaspoon of yeast because I like the flavor in bread. ½ teaspoon will work as well if you do not!
I like salt a lot- I have added up to 3 teaspoons to this recipe and it's been great!
So here’s another way of making a great No-Knead Bread.
It works well when you haven’t planned for an overnight rising. In two hours your dough is ready to make 2 large loaves or up to 12 beautiful sandwich style rolls. Here’s a run through:

In a large bowl, add 3 cups of lukewarm water with 1 1/2 tablespoons instant yeast, 1 1/2 tablespoons kosher salt, and 6 1/2 cups unbleached bread flour. Stir together until there are no more dry patches. Dough will be quite loose. Cover with a towel and place in a warm spot for 2 hours (or up to 5 hours).

At this point you can make your bread or rolls, or you can refrigerate the dough for as long as two weeks.

For a loaf, fold the four edges under, gently stretching the dough to form a smooth ball on top and a lumpy bottom. You can use flour or bran to dust a towel, (a smooth towel, not terrycloth). Let rest for 1 to 2 more hours.

Often I use this vintage pot, a treasured hand-me-down from my mother-in-law. Its sides are 4″high x 9″ across the top, and makes a great round loaf. Use a covered pot, four-quart or larger, cast-iron, Pyrex, ceramic, or enamel, that can go in a 450° oven.
You may want to sprinkle your pot with cornmeal or use a parchment round so your bread doesn’t stick. The last 30 minutes that the bread is rising, turn your oven to 450° and slip your covered pot in the oven to preheat.
Your dough should have doubled in size. Remove the pot from the oven. Holding the towel, dump the wobbly dough into the hot pot. It doesn’t matter which way it lands. Gently shake to even the dough out. Cover and bake at 450° for 30 minutes. Uncover and bake for another 15-20 minutes or until the crust is beautifully golden.
No-Knead Crusty Artisan Bread and Rolls

Remove and let cool on a wire rack. If not eaten right away, you can re-crisp crust in a 350° oven for 10 minutes. Note, I used wheat bran on my towel to keep the bread from sticking.

I have found that this is an easy and effective method to produce the kind of loaf usually on sale in artisan bakeries for a pretty penny. My bread has a dense crumb and a really crusty, crunchy crust.

My family likes it with soft butter when it’s hot right out of the oven!

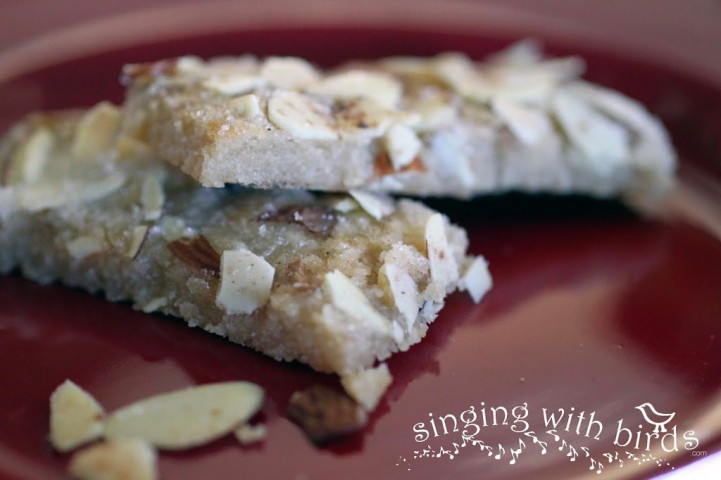
Now, for a perfectly crusty roll, this recipe will produce a dozen large hard rolls. I use the same method tucking the dough under to form a smooth top and place them on a greased and cornmeal covered cookie sheet. I like to dust the tops with a little flour.

A half-size sheet with 6 rolls fits perfectly into my toaster size confection oven. I bake them at 425°, (with confection) or 450° in a regular oven, for 16 to 18 minutes. Watch carefully your first time as some ovens vary greatly.

They bake perfectly and have a beautiful texture and appearance!

I think these rolls may be better than Parisi Brothers… at much less than 40 cents each!

I sure miss my New York friends, but love having little fans visit and enjoy what their Grammie makes for them. I love the buttery kisses and smiles I get in return. Happy baking all!

 We're Alison and Renée, and we're so glad you've joined us! Our kitchens are our happy place, where we're whipping up memories. Get comfy and check things out. We hope you find inspiring dishes and ways to better your life. Feeling optimistic, trying new things and sharing with those we love brings joy in all we do. It's time to cook, create and celebrate. CHEERS!


“buttery kisses and smiles” are worth the effort of making homemade bread! Thanks for sharing this recipe, I can’t wait to make it for my family.
Oh my goodness this looks super yummy! I LOVE bread. Also my hubbie served in up state New York. He loved it and I wrote him the entire two years. New York is amazing!
I made the bread today!! it rose so much, it got overwhelming at first….probably ’cause I didn’t have a pot like your’s (my mom did, but I think my brother took it after she died)soooooooooooo,I used my cast iron pan. it turned out GREAT!!!!!!!!!!!!
Thanks! I’m so glad you feel success and made it work for you, Angela. Also, Michelle and Melissa, thanks for your kind comments. It’s fun to hear that your husband served in NY, Melissa and that you shared in the experience by supporting him. My best to each of you.
That looks super yummy:) I would love for you to come and link up to check me out saturdays at http://www.iamonly1woman.blogspot.com
Wow this looks yummy! I have only made homemade bread once and would love to try it again! This recipe looks great.
Thank you so much for linking up today, however, I did not see a courtesy link back to my blog. This is just as a thank you courtesy but also so that your readers can read what the other participants said as well.
There is a link on the MYHSM meme post that will take you to the instructions if you’d like to read them!
Great work…again I am amazed at your artisan abilities!
Oh how crazy! I went to high school with the missionary on the far left! (if I am right…) Is he from Spanish Fork, Utah? If that is who I think it is, he is the nicest person and I am proud of him for serving a mission! I didn’t know him too well, but he could dance like michael jackson!
How fun! He was a great missionary, and spoke Mandarin Chinese, serving in the Flushing, Queens area. He is heading back to your area to continue in school next Fall. I never got to see him dance like Michael Jackson during our time together of course, but I’ll beg for a demo next time I see him. Thanks Gillian!
Renee, this looks amazing! I’ve always known that you were an incredible cook…but look at this bread! I’m gonna have to give it a try…
Whoa! I’m looking to try this. Beautiful photos!
5 years later and I am STILL making this knockout bread. Adam can be picky about food, and he devours these rolls. So glad I can make something my whole family enjoys!
Thanks Tessa, it’s one of our favorites too! I need to redo these pics don’t I? Sending love to you and Adam and your darling!